How to use TRIM command
Here is a free course how to use Trim command in AutoCAD
- Use the Trim command to remove unwanted segments of objects.
- you are prompted first to select cutting objects.
- cutting objects can be LINEs, ARCs, CIRCLEs, POLYLINEs, ELLIPSEs, SPLINEs and even TEXT (bounding box of text).
if you press <enter> instead of selecting cutting edges AutoCAD uses all objects as cutting edges (without highlighting them).
- After specifying which objects are to be used as cutting edges you are prompted for objects to trim.
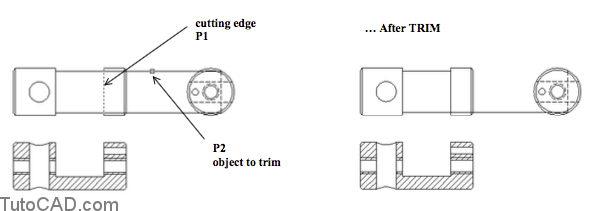
- it is important where you select objects to trim because AutoCAD uses the selection point to determine the side to delete.
Command: TRIM ↵
Current settings: Projection=UCS Edge=None Select cutting edges …
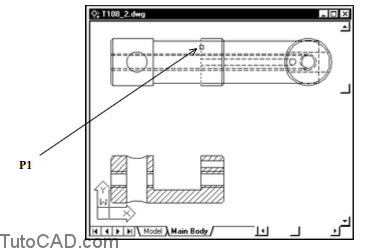
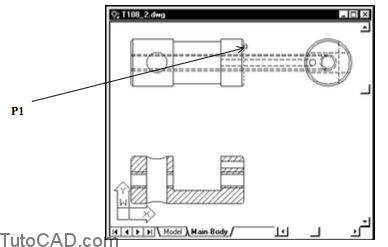
Select objects: (pick vertical LINE near P1)
Select objects: ↵
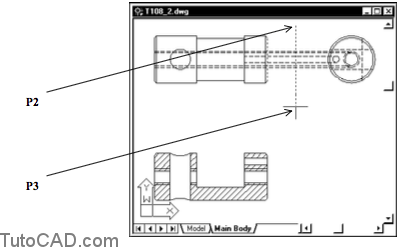
Select object to trim or [Project/Edge/Undo]: (pick horizontal LINE near P2)
Select object to trim or [Project/Edge/Undo]: ↵
Command
 You can select as many cutting edge objects as you wish using any selection tool (e.g. Window or Crossing)
you can select objects to trim (one-at-a-time) using your pickbox in the same Trim command
and you can also use the Fence tool to select several objects to Trim against the same cutting edges in one step.
When the first Trim command line prompt says Edge=None your cutting edges must actually cross objects to trim them.
whereas when Edge=Extend the cutting objects can imply extended edges in the Trim command.
you can use the Edge option of Trim when AutoCAD prompts for objects to trim and select a different mode for Edge.
Select object to trim or [Project/Edge/Undo]: (right-click and select Edge)
Enter an implied edge extension mode [Extend/No extend] <No extend>: (right-click)
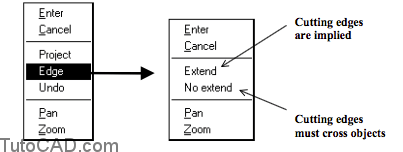
- The Edge setting is saved in the EDGEMODE system variable and this variable is stored in your system registry.
if you change this setting it will affect all drawing sessions on your system until you change it again.
the initial setting for EDGEMODE is 0 (Edge=None).
- The Break command is another way to remove portions of selected 2D objects and you can use this as an alternative to Trim.
this command does not require cutting edge objects and is normally used only when approximate results are required.
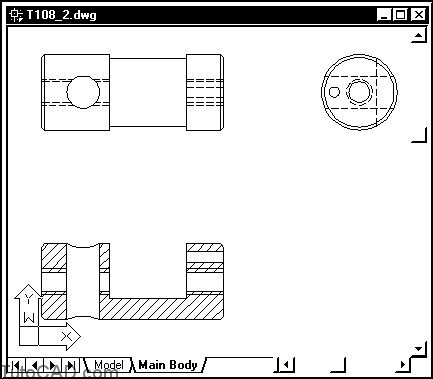
Practice : HOW TO USE TRIM TUTORIAL IN AUTOCAD
- Close the drawing from the previous exercise if it is open.
- Open the T108_2.dwg drawing in your personal folder.
- Pick Modify + Trim. Select the vertical LINE near P1 as the cutting edge and then press <enter> to signal AutoCAD that you have selected all cutting edges.
- Select the horizontal LINE near P2 then the other horizontal LINE near P3 as objects to trim. Then press <enter> to complete the Trim command.

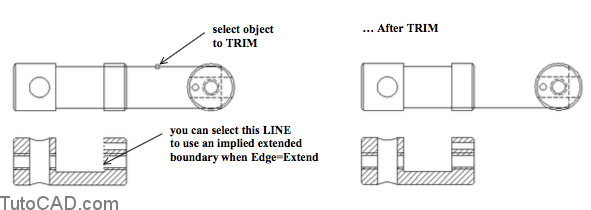
You select these LINEs to Trim one-at-a-time and AutoCAD uses the selection point to determine which side of the LINE to delete.
– you can also enter F at the prompt to select objects to trim and then draw a Fence across the desired objects in one step.
- Right-click in the drawing area and select Repeat Trim.
- Select the vertical LINE near P1 at the far right edge of the top view as the cutting edge and press <enter> to signal AutoCAD that you have selected all cutting edges.
- Type F at the prompt to select objects to trim to invoke the Fence tool. Then pick near P2 and P3 to draw a single fence segment and press <enter> to complete the Fence tool but do not exit Trim yet. (The command line history is shown.)
Select cutting edges …
Select objects: (select vertical LINE near P1)
Select objects: ↵
Select object to trim or [Project/Edge/Undo]: F ↵
First fence point: (pick near P2)
Specify endpoint of line or [Undo]: (pick near P3)
Specify endpoint of line or [Undo]: ↵
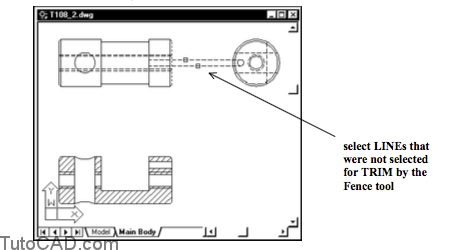
- Some LINEs may not be selected by the Fence tool because of their hidden linetype. Select these LINEs individually and then press <enter> to signal AutoCAD that you have selected all objects to Trim and complete this command.
- Right-click in the drawing area & select Repeat Trim again from the shortcut.
- This time press <enter> at the prompt to select cutting edges so AutoCAD uses ALL objects as cutting edges (no objects will be highlighted). Select LINEs for the tapped hole at appropriate places when AutoCAD prompts to select objects to trim. Then press <enter> to exit Trim.
If you pick the wrong object to Trim you can right-click to select Undo and then continue in the same Trim command.
- Save your changes to this drawing & Close this file.