How to create a Page Setup For The Model
Free course how to create a Page Setup For The Model in AutoCAD
You will probably encounter drawings that have been set up to Plot from the Model tab (even if you use layouts in your drawings).
- these drawings normally have a title block inserted into the model at a scale that is inversely proportional to the drawing scale.
- for example, if the drawing scale is 1:48 (1 /4”=1’) the title block would be inserted into the model at a scale of 48.
- when you plot using the intended plot scale (e.g. 1:48) the title block ends up being the desired (true) size in the plot.
- this process is shown below for a 1:48 drawing scale example.

You can use the Page Setup utility on the Model tab using a similar process for setting up a Layout tab.
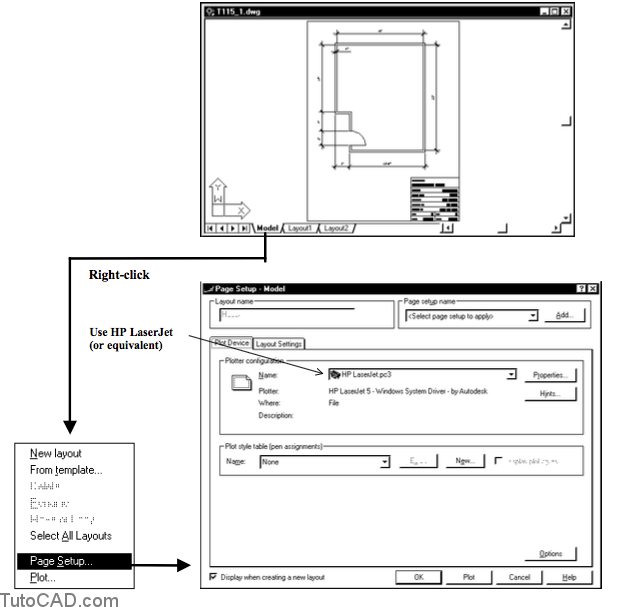
- right-click on the Model tab to invoke a shortcut and select the Page Setup option to set up the Model tab for plotting.

The Layout Settings tab in Page Setup groups various settings into the following logical categories
– Paper size and paper units
– Drawing orientation
– Plot area
– Plot scale
– Plot offset
– Plot options

Plot area settings specify which area of your drawing to plot.
– use Limits to plot the drawing limits (if they have been set).
– use Extents to plot the drawing extents (preferred if your title block objects are only slightly smaller than the printable area).
– use Display to plot only the area of the drawing that is currently displayed in the drawing window on the Model tab.
– use View to plot a saved view (unavailable when there are no views saved in the current drawing).
– use Window when you pick the Window button and then pick a window on screen to define the desired area to plot.
Paper size and paper units
The available paper sizes to chose from will depend on the plot device that you select on the Plot device tab.

The Printable area is determined by the plot device that you select in the Plot Device tab and you cannot change this.
– but you can decide on whether to define paper units as inches or as mm (which has an impact on how you specify plot scale).

Plot Scale
Plot scale can be selected from standard drawing scales in a drop-down list
– this is particularly useful when you use Architectural scales (such as 1/4”=1’).
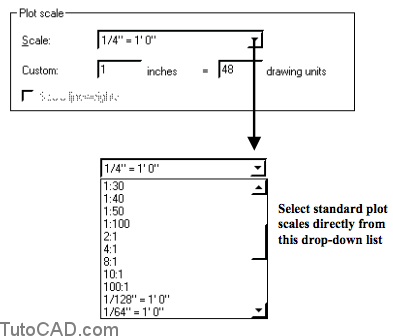
You can also specify a plot scale “equation” by entering values directly in the Custom paper units and drawing units boxes.
– for example, you could enter 1 for the paper units (inches) and 96 in the drawing units box for a 1:96 scale (1/8”=1’)
– when you enter values directly in these Custom boxes the Scale drop-down box changes automatically to Custom.

The Scale lineweights check box is not available when you Plot the Model (i.e. not a layout).
– lineweights are used directly (no scaling) if Plot with lineweights is checked in the Plot options settings.
Plot Options
Plot options settings let you control whether you Plot with lineweights & Plot with plot styles.
– Hide objects check box determines whether or not to plot with hidden lines (behind surfaces in 3D drawings) removed.

Drawing Orientation
Drawing orientation is used to control whether the plot is portrait or landscape and you can also plot upside-down.
– the letter “A” in an icon updates when you change settings to illustrate how the plot will be oriented on the page.

Plot Offset
You can enter X and Y offset values from the printable margin (using paper units) in the Plot offset settings area.
– you can also check Center the plot to avoid having to calculate the offset required for this.

Practice tutorial: using Page Setup on the Model tab in AutoCAD
- Launch AutoCAD (if it is not already running). Close all open drawings (if there are drawings open).
- Open the T115_1.dwg drawing in your personal folder.
- Right-click on the Model tab to invoke a shortcut menu and select Page Setup. On the Plot Device tab select the HP LaserJet device (or the device your instructor tells you to use instead) and select the Layout Settings tab to continue.
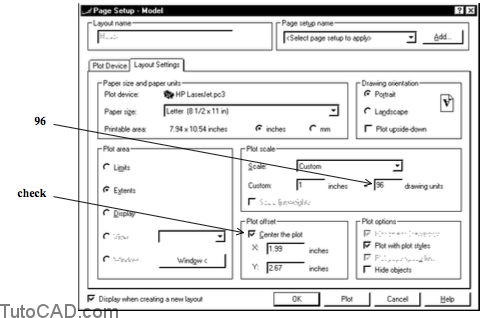
4- Make the indicated changes and pick OK.

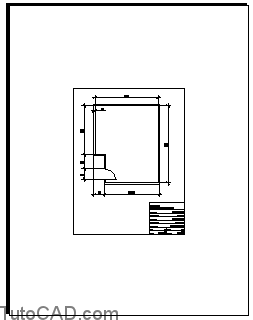
5- Pick File + Plot Preview. Examine the preview then press <enter> to continue.

This drawing is intended to be output (plot) from the Model tab and the drawing scale is designed to be 1/4”=1’ (1:48).
– you can easily select standard plot scales from a drop-down list (including architectural scales).
You can also enter the equivalent values in the paper units and drawing units boxes to define a plot scale “equation”.
– in this example, you could enter 1 (paper units) inches = 48 drawing units in the appropriate boxes as shown above.
– you can select either the inches or mm radio button next to Printable area (Paper size & paper units) to set paper units.
6- Right-click on the Model tab again and select Page Setup. Change the drawing units box to 96 (from 48) and check the Center the plot box. Then pick OK.
7- Pick File + Plot Preview and then press <enter>.

When you enter your own values in the plotted units and drawing units boxes the plot scale drop-down box changes to Custom
– you made these objects plot at half their original size by increasing the drawing units value by a factor of 2.
You centered the plot on the specified sheet by checking the Center the plot box
– you could also enter specific values for the X and Y offsets in the appropriate Plot Offset box.
8- Right-click on the Model tab again and select Page Setup. Check the Plot upside-down box. Then pick OK.

9- Pick File + Plot Preview and then press <enter>.
 The preview of upside down plots will be right-side up even though it will actually plot upside down.
Previews will appear upside-right even if you configure the plot to be output upside-down on the page.
– however, it will be upside-down on the page when you Plot.
10- You can Close the current drawing without saving changes.