How to use OFFSET command and Makes Parallel Objects
Here a free course to use OFFSET command in AutoCAD (Makes Parallel Objects)

Offset command creates new objects parallel to existing 2D objects such as
- LINEs, ARCs, CIRCLEs, ELLIPSEs, POLYLINEs & 2D SPLINEs.
- The new (offset) objects have the same properties (e.g. LAYER) as the objects selected for Offset.
- the current Layer has no effect.
- You can control the space between the new and original objects by
using either the distance or through methods.
- the through method is the default the first time you use Offset in a drawing session.
- if you use the distance method this is retained as the default method in the current drawing session.
- Specify the distance (the space between new & original objects) when you know the required distance.
Command: OFFSET ↵
Specify offset distance or [Through] <Through>: 1 ↵
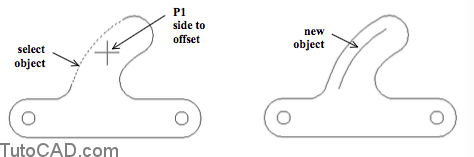
Select object to offset or <exit>: (pick ARC)
Specify point on side to offset: (pick near P1)
Select object to offset or <exit>: ↵
Command:
You are prompted to select more objects and these objects would be Offset using the same distance.
- -you must press <enter> or <esc> to terminate Offset.
- -you must complete the current Offset command and then invoke Offset again to specify a different distance.
- If you do not know the required distance you can specify a point that the new object must pass through.
Command: OFFSET ↵
Specify offset distance or [Through] <1.0000> : T ↵
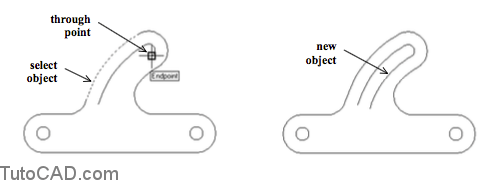
Select object to offset or <exit>: (pick ARC)
Specify through point: (use ENDPOINT)
Select object to offset or <exit>: ↵
Command:
Distance
When <Through> is the default method on the command line you can type the desired distance to use the distance method.
Specify offset distance or [Through] <Through>: 1 ↵
Through
You can enter T after using the distance method to switch back to using the Through method
Specify offset distance or [Through] <1.0000>: T ↵
– you can also right-click in the drawing area and select Through
from a shortcut menu.
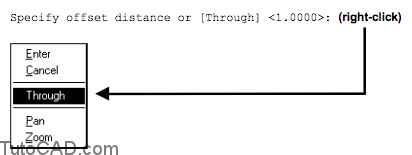
– when <Through> is listed as the default method on the Command line you can press <enter> to use this method.
Practice with OFFSET Tutorial in AutoCAD
- Launch AutoCAD (if it is not already running). Close all open drawings (if there are drawings open).
- Open the T108_1.dwg drawing in your personal folder.
- Pick Tools + Run Script. Select your personal folder to Look in and select T108.scr as the script File name. Then pick the Open button to run this script. This sets drafting tools to match the behavior described in the exercises.
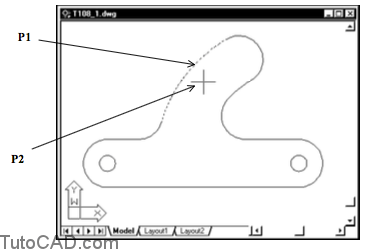
- Pick Modify + Offset. Type 1 as the distance then press <enter>. Select the ARC near P1 when prompted to select an object to offset. Then pick near P2 as the side to offset. (Remain in this command for the next step).
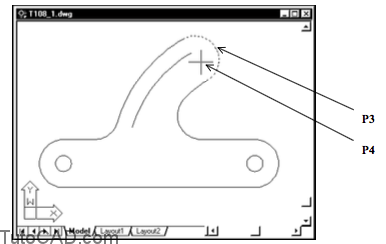
- Select the ARC near P3 as the next object to offset and then pick near P4 as the side to offset. Press <enter> to terminate Offset.
- Left-click on the OSNAP status bar button to toggle the running osnaps On.
![]()
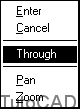
- Right-click in the drawing area to invoke a shortcut menu and select Repeat Offset.

- Right-click in the drawing area again to invoke another shortcut menu and select Through. (AutoCAD will supply the T response to the first Offset prompt.)
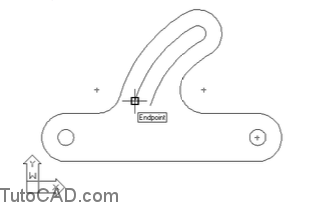
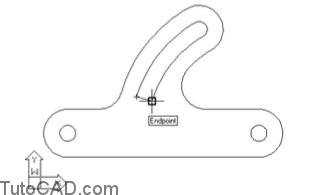
- Select the ARC near P1 as the object to offset. Hold your crosshairs over the end of the offset ARC to invoke the Endpoint osnap shown and left-click to use this as the Through point. Then press <enter> to terminate Offset. The command history for this command is shown below.

Command: _offset
Specify offset distance or [Through] <1.0000>: T
Select object to offset or <exit>: (select ARC near P1)
Specify through point: (use ENDPOINT shown)
Select object to offset or <exit>: ↵
Command:
- Pick Draw + Arc + Start,End,Angle. Invoke the Endpoint osnap shown below as the Start point then left-click to use this point.
- Invoke the Endpoint osnap shown as the End point and left-click to use this point. Then enter 180 as the included angle to create the ARC.
- Save your changes to this drawing and Close the file.