How to manage Object Properties BYLAYER
Here is how to manage object properties in AutoCAD
- You can explicitly assign properties like color, linetype, lineweight Plot style to objects.
- assigning object properties explicitly is not as practical as assigning object properties BYLAYER.
- when you explicitly assign properties to objects you lose the ability to change the properties of objects on an entire layer.
- good CAD practice is to assign object properties BYLAYER.
- Use the Layer command to create new layers and assign object properties BYLAYER.
- the Layer command invokes a powerful dialogue box with many features to help you manage layers effectively.
- in this document you will learn basic features and techniques to manage layers using the Layer dialogue box.
- You can use layers effectively even if you do not know everything about the Layer dialogue box.
- if you learn more about Layer dialogue box features you will be more productive in AutoCAD.

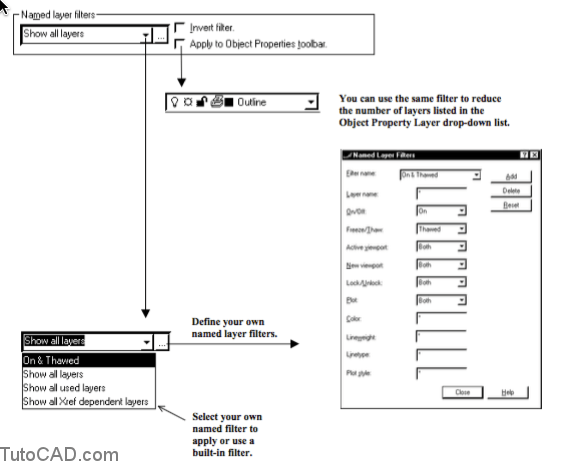
- Drawings can have hundreds of layers and it can be awkward to work in the Layer dialogue box in these situations.
- you can define Named layer filters to reduce the number of layers that are listed in the Layer dialogue box.
- for example, you could create a filter to list only the layers that are currently On and Thawed.
- there are also built-in filters that let you Show all layers or Show all used layers
- any layer filter (named or built-in) can be inverted (e.g. Invert Show all layers and no layer names will be listed).

Layer filters apply to layer names listed in the Layer dialogue box – but you can also choose to apply the current filter to the Object Properties toolbar.

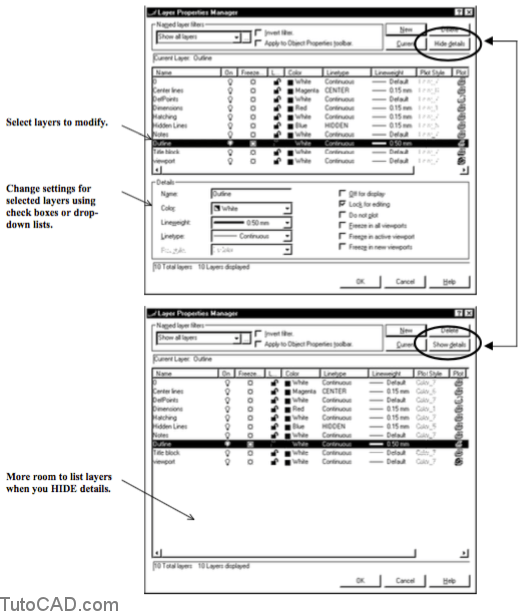
- You can manipulate all layer settings when you Hide Details and there will be more space available to list layers.
- with Hide Details selected you can left-click on appropriate areas of the Layer dialogue box to invoke other dialogue boxes.
- when you use the Show Details option you can modify settings using standard check boxes or drop-down lists.
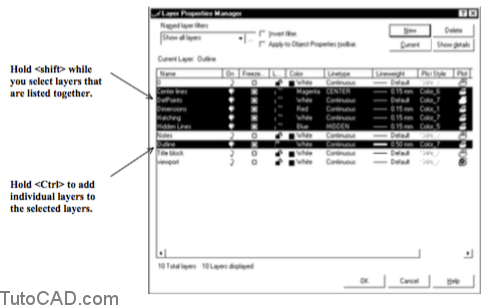
- You can select multiple layer names in the Layer dialogue box using familiar windows techniques.
- press & hold <Ctrl> while you select individual layers that are not listed together.
- press & hold <Shift> to select all layers between the currently selected layer and the layer that you select next.

- If you right-click in the Layer dialogue box you will invoke a useful shortcut menu to speed up the process of selecting layers.

- -pick Select All to select all layers in the list.
- -pick Clear All to de-select any layers currently selected.
- -pick Select all but current to select all layers except the current layer (e.g. then Freeze all selected layers).
- -pick Invert selection (if you right-clicked on a selected layer) to Clear currently selected layers & Select currently cleared layers.
- -you can even manipulate the built-in and named layer filters from this shortcut menu.
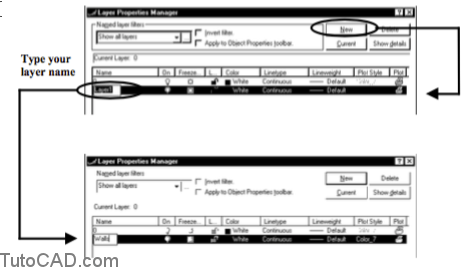
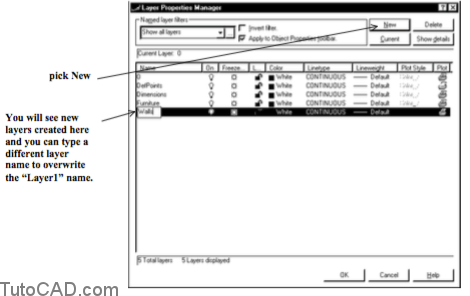
Pick the New button in the Layer dialogue box to create new layers.
- -you can also right-click in the Layer dialogue box and select New Layer from the shortcut menu.
- -the layer name will be Layer# (where # is an integer that defines
a unique name) unless you type a name for the new layer.
Long Layer Names
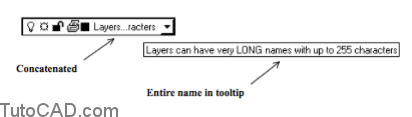
Layer names can have up to 255 characters.
- -long layer names are concatenated if they cannot be displayed in the Layer dialogue box or Object Properties drop-down list.
- -hold your cursor over a concatenated name to see the entire layer name in a tooltip.
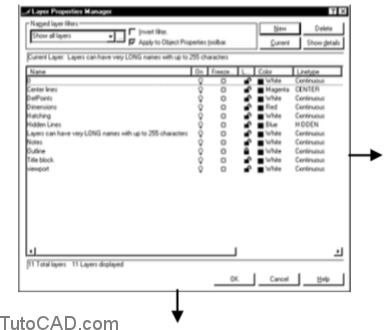
You can resize columns in the Layer dialogue box to display longer layer names & avoid concatenated names in the list.
– use your left-mouse button to drag the separators between column headings to the desired width.
– double-click on a column heading separator to make a column wide enough to display the longest entry in that column.
– if you make columns too wide you may have to use the scroll bars to see other columns in the dialogue box.

You can also drag the outer edges of the Layer dialogue box in the same way that you can resize other Windows.
– use your left mouse button to drag the outer edges of the Layer dialogue box to the desired size.
– there is a minimum size for the Layer dialogue box.
Column Headings
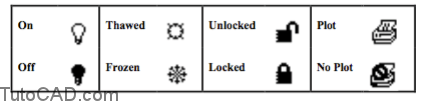
The same icons displayed in the Layer drop-down list on the Object Properties toolbar are also used in the Layer dialogue box.
– you can toggle the status of these settings by left-clicking on the appropriate icons for the desired layers.
– you will learn about the other headings later as each object property is explained in this course.
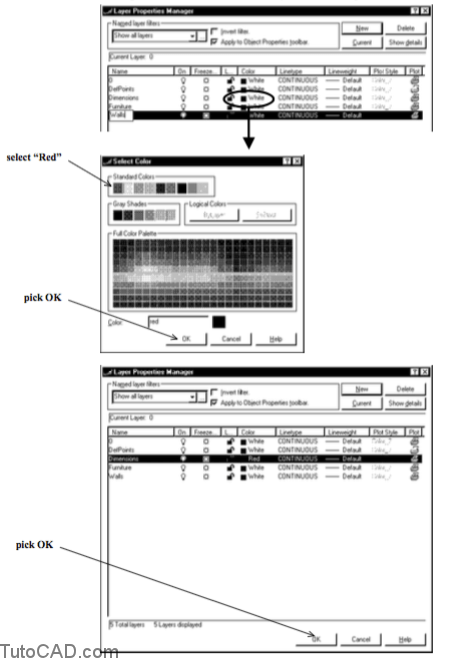
- Object color can be assigned BYLAYER such that all objects on a particular layer are displayed with the same color on-screen.
- – left-click on the color swatch for the desired layer in the Layer dialogue box to invoke the Select Color dialogue box.
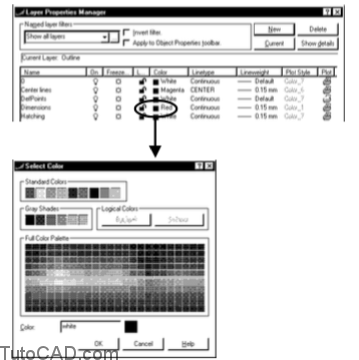
- You can select a color by left-clicking on the desired color swatch in the Select Color dialogue box
- – or you can type a name or ACI number in the Color edit box.
- The first 7 Standard Colors have both a name and an AutoCAD Color Index (ACI) number.
- -Red [1], Yellow [2], Green [3], Magenta [4], Blue [5], Cyan [6], White [7] (White displays as Black on white backgrounds).
- -all colors can be referred to by an ACI number and you can select one of 255 different screen colors for each layer.
- The color assigned to the current layer is also displayed in the Layer drop-down list on the Object Properties toolbar
- – but you cannot invoke the Select Color dialogue box by left-clicking on the color swatch in the drop-down list.
practice assigning object color BYLAYER
- Close the drawing from the previous exercise.
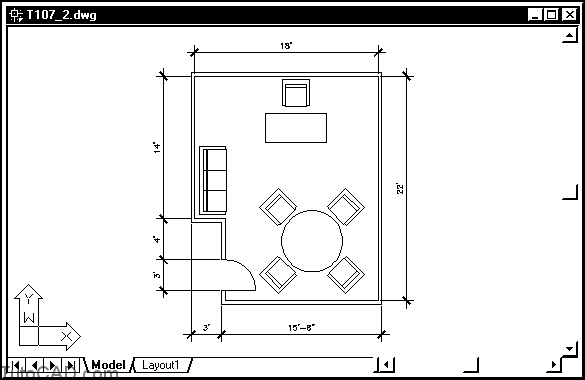
- Open the T107_2.dwg drawing in your personal folder.
All objects in this drawing are on layer 0. In this exercise you will define new layers and move objects to appropriate layers.
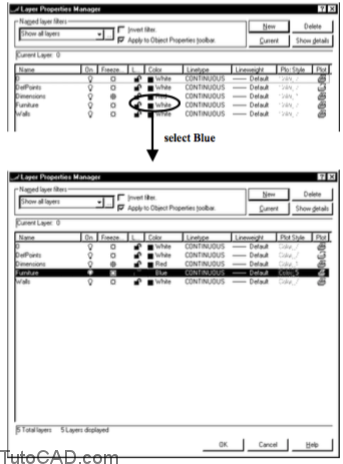
- Pick Format + Layer. Then pick the New button in the Layer dialogue box. Type Dimensions,Furniture,Walls (each time you type a comma a new layer is created and you can type a new name for the new layer) at the keyboard to create three new layers. (Do NOT pick OK yet)
- Left-click on the color swatch of the Dimensions layer to invoke the Select Color dialogue box. Left-click on the Red swatch in Standard Colors & pick OK to return to the Layer dialogue box. Pick OK to complete the Layer command.
- Make sure there is no command running then select each of the DIMENSION objects. When all dimension objects are selected select Dimensions in the Layer drop-down list of the Object Properties toolbar. Then press <Esc> twice to clear the grips of the selected objects.
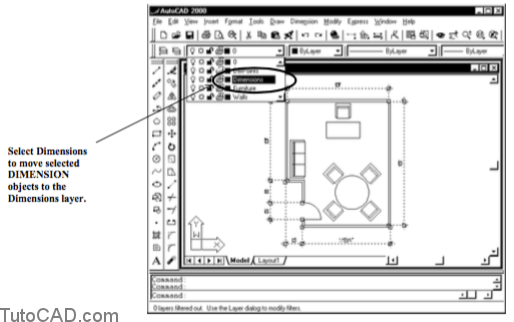
The DIMENSION objects should now be red on-screen.
– you created a layer called Dimensions and then assigned the
color red to this layer.
– then you moved the DIMENSION objects from layer 0 to the Dimensions layer.
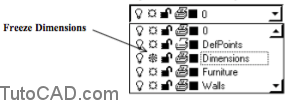
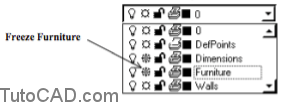
- Drop-down the Layer list in the Object Properties toolbar and left-click on the Sun icon to Freeze the Dimensions layer. Then roll up the list.
- Pick the Layer toolbar button on the Object Properties toolbar. Left-click on the color swatch for the Furniture layer and select Blue from the Standard Colors. Pick OK to return then pick OK to complete Layer.
You Froze the Dimensions layer using the Layer drop-down list in the Object Properties toolbar
– the same Frozen icon appears beside the Dimensions layer name when you use the Layer command.
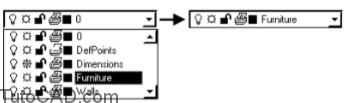
- Select all furniture symbols when no command is running then select Furniture in the Layer drop-down list of the Object Properties toolbar. Roll up the list and observe the layer name in the rolled-up state.
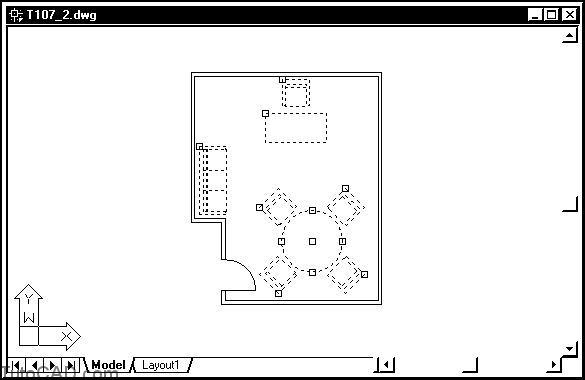
- Press <Esc> to de-select these objects and press <Esc> again to clear the grips. Observe the layer name listed in the Layer drop-down list.
![]()
When there are no objects selected the Current layer name is listed in the Layer drop-down list on the Object Properties toolbar
- -if you select objects when no command is running the layer name of the selected objects is listed in the Layer drop-down list.
- -if you select objects that are on two or more different layers then there is no layer name listed in the Layer drop-down list.
- -you can select any layer name in the Layer drop-down list to move selected objects to this layer.
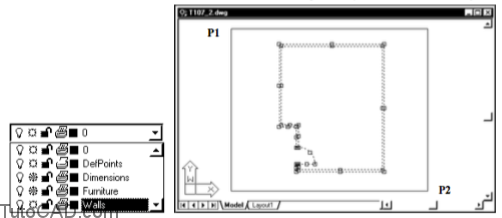
- Drop-down the Layer list and Freeze the Furniture layer. Then roll up the list.
- Left-click near P1 then pick near P2 to invoke an implied Window and select the remaining objects visible on-screen. Select Walls in the Layer drop-down list & roll up the list.
- Type LA at the keyboard to invoke Layer. Select the Dimensions layer. Pick New and type Doors.
The new layer has the same properties and settings as the selected layer.

- Right-click in the Layer dialogue box to invoke a shortcut and pick Select All. Then left-click on one of the snow flake icons to Thaw all selected layers. Pick OK to complete these changes.
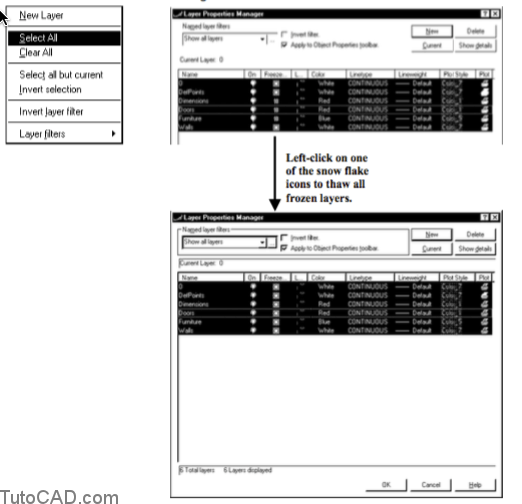
If several layers are selected you can change the setting of one selected layer to change that setting for all selected layers.
- Select the LINE and ARC that represent a door and then pick Doors in the Layer drop-down list. Press <Esc> twice to clear the grips.
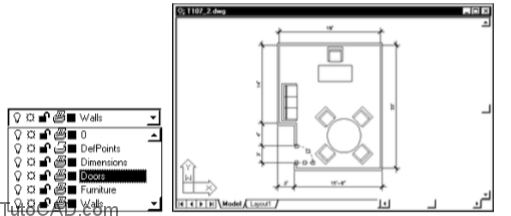
- You have quickly improved the quality of this drawing by placing objects on different layers.
- layers use different colors so it is easier to identify which objects belong to each layer.
- You have controlled object color BYLAYER
- -you can use similar techniques to assign linetype, lineweight and plot style BYLAYER as well.
- -you will be learning more about these other object properties later in this document.
- Save the changes to this drawing then Close the file.