How to edite Dimensions
Free tutorial how to edite Dimensions in AutoCAD
- There are many ways to edit existing dimensions & the method you choose will depend on the type of change & number of dimensions.
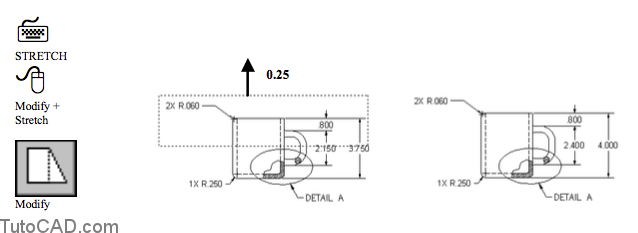
- You can use Stretch on dimensions and the dimension text will update automatically (unless you replaced <> with text).
You can also use grip editing techniques to stretch grips of dimension objects for various different effects.
- select a dimension if no command is running to display grips.
- left-click on a grip to make it hot and then pick a new point to stretch that grip.
You have already seen how you can create an Override and then Update selected dimensions to change how dimensions appear.
- you can use overrides for the next few (new) dimensions you create if they must be slightly different than the current style.
- but the Override/Update approach can be awkward for making minor changes to a few existing dimensions.
You can make common changes to existing dimensions using a shortcut menu instead of using the Override/Update approach.
- select the dimension(s) that you want to change when no other command is running to highlight those dimensions
- then right-click to invoke a shortcut menu and select the desired option to change the selected dimension(s).
Using the Override/Update approach to change dimensions is NOT practical for quick changes to existing dimensions.
Editing dimensions using the shortcut menu is practical but you cannot change all dimension variables (properties) with a shortcut.
The Properties command lets you modify all dimension variables in an efficient interface (with only slightly more effort than a shortcut).
- select dimensions that you want to change when no command is running to display their properties in the Properties list.
- you can also use the Quick Select tool to help you select the desired dimensions automatically if you wish.
You can select as many objects as you wish and the total number of selected objects is listed in the Properties drop-down list.
- you can then restrict edits to specific object types by selecting the desired object types in the Properties drop-down list.
The categories for dimensions correspond to the tabs in the Dimstyle dialogue box
- and you can use the Misc category to change the dimension style of selected dimensions.
Practice changing existing AutoCAD dimensions tutorial
- Close the drawing from the previous exercise if it is open.
- Open the T112_12.dwg drawing in your personal folder.
- Zoom In for a closer view of the large (current) viewport.
- Select the dimension near P1 when no command is running to display the grips. Pick the grip near P1 to make it hot & pick near P2 to stretch this dimension to a new location.
This technique is a quick way to tweak dimensions into the desired locations relative to the objects being dimensioned.
– as you add dimensions in a drawing you may have to move existing dimensions around to make room for new ones.
- With the same dimension still selected, right-click in the drawing area to invoke a shortcut. Select Dim Text position + Above dim
line.
- Zoom In for an even closer view of the .250 dimension for the wall thickness.
In the next few steps you will use Properties to edit this dimension to suppress the extension lines (they are not required)
– and you will add a suffix to the dimension text.
7- Select the .250 dimension when no command is running. Right-click in the drawing area to invoke a shortcut and select Properties.
8- Expand the Lines & Arrows category and scroll down the list to select Ext line 1. Double-click on the On setting to toggle it Off.
9- Repeat for Ext line 2 so that both extension lines are Off.
The categories listed for dimension objects correspond to the tabs in the Dimstyle dialogue box.
– if you select a category item on the left side you will see a brief description for that item in the description area.
10- Contract the Lines & Arrows category.
11- Expand the Text category.
12- Scroll down the list & select the Text override box. Type the characters <> TYP so that the word “TYP” is added as a suffix to the measured value represented by “<>”.
13- Pick Tools + Properties to dismiss Properties. Then press <Esc> twice to clear the grips.
You can also edit dimension text in the Multiline Text Editor by using the ddEdit command.
– pick Modify + Text in the pull down menu and select the desired dimension to edit the dimension text.
14- Save the changes to this drawing and close the file.
More Practice
Open the T112_13.dwg in your personal folder and use the following illustration as a guide to dimension this model.
Open the T112_14.dwg in your personal folder and use the following illustration as a guide to dimension this model.
Open the T112_15.dwg in your personal folder and use the following illustration as a guide to dimension this model.
Open the T112_16.dwg drawing in your personal folder and use the following illustration as a guide to dimension this model.


 line.
line.


