Dimension Styles Overview
Dimension variables are special system variables stored in each drawing to control the way dimensions appear.
- a dimension style is a collection of dimension variable settings that you save with a unique name in a drawing.
- you can completely change the way dimensions appear by changing the variable settings saved in a dimension style.
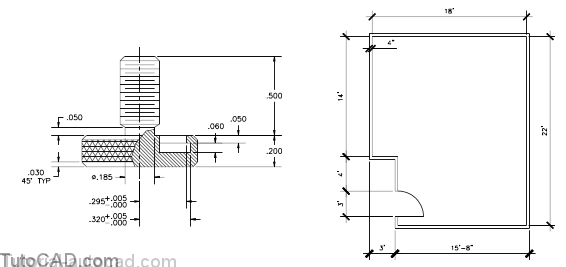
- for example, the illustrations below compare AutoCAD dimension styles in drawings created for two different industries.
There are more than 60 dimension variables but you will probably change only a few of these settings to match your preferences.
- in this document you will learn about key variables and you will learn how to create & manage styles.
- you will also learn how to use AutoCAD Help to learn more about individual variables on your own.
Some custom dimension styles are already defined in the template drawing files supplied with AutoCAD.
- however, you will probably want to refine these styles before you use them in your drawings.
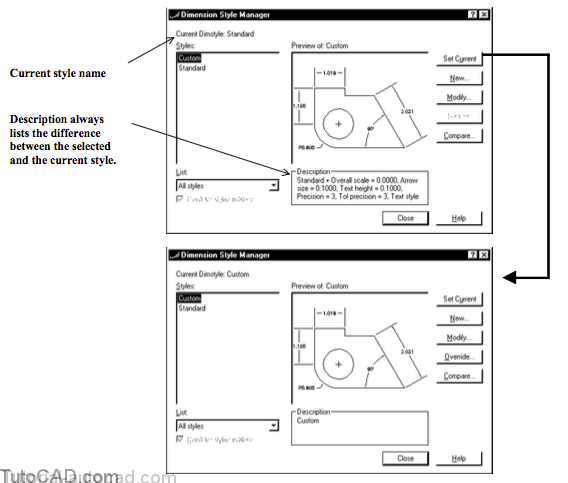
You can create and edit (manage) dimension styles in the Dimension Style Manager using the Dimstyle command.

Dimension styles defined in the active drawing (or used in Xrefs) are listed in the Styles list.
- when you select a style in the style list you see a Preview of dimensions for the selected style.
- a description also appears to show how the selected dimension style differs from the current style settings.
- sub styles and overrides of named dimension styles are also listed under the parent style in a tree structure.
- you can use many dimension styles in the same drawing file (each dimension object can be created using a different style).
New drawings created from scratch for English default settings have a Standard dimension style already defined in the drawing.
- if you use Metric default settings you get ISO-25 instead.
- the Standard & ISO-25 styles will probably need at least some minor changes to suit your preferences.
It is not good CAD practice to change Standard & ISO-25 styles.
- you should create your own customized dimension styles and define them to your preferences instead.
- you can create a new style from one of these styles, give it a new name and change settings to your preferences.
Changing the current style
The current style name is listed in the upper left corner of the Dimstyle dialogue box.
- select the desired style name to make current in the Styles list and then pick the Set Current button.
- new dimensions are created using the dimension variables of the current dimension style.
The current style name is listed in the upper left corner of the Dimstyle dialogue box.
- select the desired style name to make current in the Styles list and then pick the Set Current button.
- new dimensions are created using the dimension variables of the current dimension style.
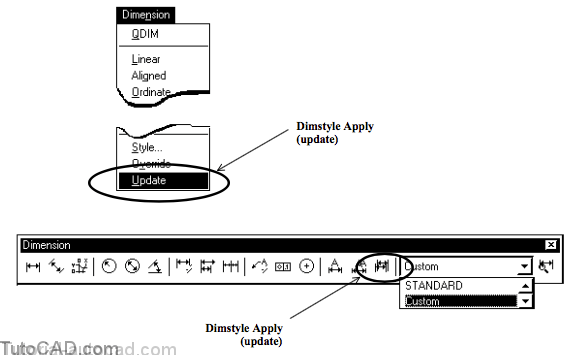
You can also double-click on a name in the style list to make it the current dimension style
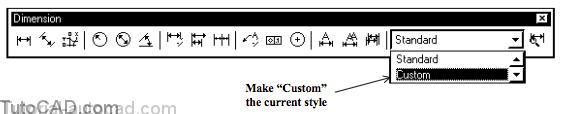
- or select the current dimension style from a drop-down list in the Dimension toolbar.

It may be unnecessary to define new styles completely from scratch if you have access to drawings that are already set up.
- use AutoCAD DesignCenter to drag & drop dimension styles stored in other (closed or open) drawings into the active drawing
- you could quickly adapt a style (defined by someone else) to your own personal preferences after a few minor changes.
- this is also an effective way to import dimension styles into the custom template files that you use for making new drawings.

You can also use the property painter to import a style that is defined in another (open) drawing into the current drawing.
Invoke Matchprop when the source drawing is the active drawing and select a dimension that uses the desired dimension style.
- make the destination drawing the active drawing.
- select dimensions for which to apply the dimension style of the selected source dimension.
- the desired dimension style is imported into the destination file and the selected dimensions are updated (in one step).
You can even import a dimension style that is defined in an Xref into the active (host) drawing file using the Dimstyle command.
- uncheck Don’t list styles in Xrefs in the Dimstyle dialogue box.
- select the desired Xref style in the Dimstyle styles list.
- pick New in Dimstyle then Start with that Xref dimension style (but use a new name of your choice).
Updating existing dimensions to the current style
The easiest way to update an existing dimension to use the current dimension style is with the Apply option of Dimstyle.
- you must invoke Dimstyle in the command mode (by typing a hyphen before typing DIMSTYLE) to use this technique.
- if you invoke the Dimstyle dialogue box instead you will not be able to use this technique.
Command: – DIMSTYLE ↵
Current dimension style: Standard
Enter a dimension style option [Save/Restore/STatus/Variables/Apply/?] <Restore>: APPLY ↵
Select objects: (pick desired objects)
Select objects: ↵
Command:
When you select this option from a menu the option is invoked automatically and you do not have to type a hyphen.
- you will be practicing this technique in the first exercise.
When you set the desired dimension style as the current style, all new dimensions will automatically use this style.
- so you can save time by making the desired dimension style current before you create a dimension.
PRACTICE WORKING WITH EXISTING DIMENSION STYLES
»1) Launch AutoCAD (if required). Open both T205_1.dwg and T205_2.dwg drawing files in your personal folder. Close all other drawings (if other drawings are open).
»2) Pick Tools + Run Script. Select the T205.scr script file in your personal folder and pick the Open button there to run this script. This sets several system variables to match the behavior illustrated in this manual
»3) Make T205_1.dwg the active drawing (if it is not the active drawing, select this drawing in the Window pulldown menu).
»4) Pick Window + Cascade.
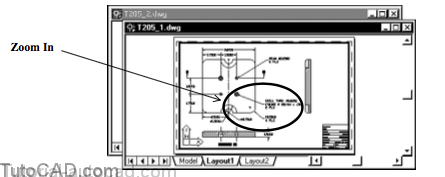
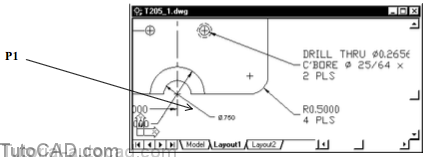
5) Zoom In for a closer view of the dimensions shown below. Your T205_1.dwg drawing window should look like the illustration below before you continue.

T205_1.dwg (active drawing) was dimensioned with the Standard dimension style (as it is defined when you start from scratch)
- the precision (number of decimal places) is 4
- the font for dimension text is TXT.shx
- text height & arrow size are both large (0.1800 inches)
- there are zeros before decimal places for values less than 1.
» 6) Pick Window + T205_2.dwg to make it the active drawing.
» 7) Zoom In to have a closer look at some of the dimensions.
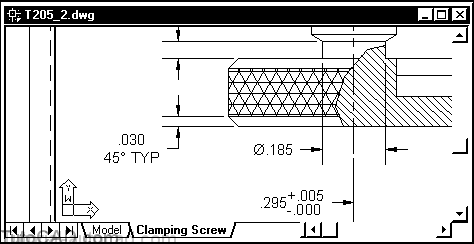
This drawing was dimensioned using a dimension style called Custom (which is more refined than Standard).
- precision is 3
- font (defined in the Notes text style) is Arial
- text heights and arrow sizes are smaller (0.125)
- leading zeros are suppressed (as per ANSI standards).
8) Pick Window + T205_1.dwg to make it the active drawing.
9) Right-click on any toolbar button to invoke a shortcut and select Dimension (if it is not already checked) to display the Dimension toolbar.

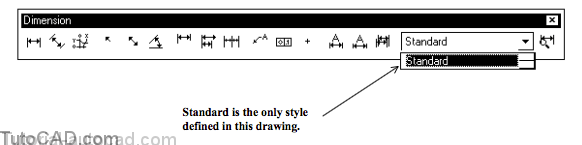
10) Pick the down arrow in the drop-down list to verify that Standard is the only style defined in T205_1.dwg.
11) Pick Tools + AutoCAD DesignCenter to launch this utility if it is not already running on your system. Make sure the Tree View is On then pick the Open Drawings button to display the two open drawings in the palette.
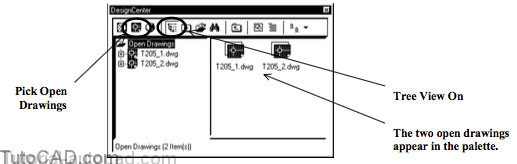
DesignCenter may be docked on the side of your AutoCAD window or it may be floating in a window as shown in these illustrations.
- it may also be much larger than shown but the way DesignCenter appears will not matter in this exercise.
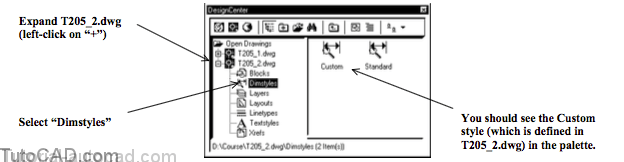
12) Expand the T205_2.dwg on the left panel of DesignCenter to see the content types for this drawing. Select Dimstyles on the left panel to display the dimension styles defined for this drawing in the palette.
13) Use your right mouse button to select Custom in the palette then drag & drop this style into the T205_1.dwg window. Select Add Dimstyles when you release your mouse button.

» 14) Pick Tools + AutoCAD DesignCenter to dismiss this utility (you can leave it running if you wish).
» 15) Select Custom in the Dimension toolbar drop-down list to make this the current dimension style.
16) Pick Dimension + Update and select the dimension near P1. Press <enter> to continue.
The selected dimension now uses the same dimension style and associated dimension variables as defined in the other drawing.
17) Pick Dimension + Update. Enter ALL to select all objects in the drawing and press <enter> to complete the task.

18) Save the changes to the active drawing then Close both open drawing files.