How to create and use Groups
Selection sets are normally temporary but it is possible to Group objects together into a more permanent selection set.

Groups can be unnamed but it is practical to assign new groups a name to remind you what each group represents.
- if a group has a name you can enter G at the “Select objects” prompt to specify the name of the group you wish to select.
- you can practically think of groups as named selection sets.
With <Group On> you can select all members of a group by selecting one member of that group (like a block insert)
- but that group must be designated selectable & the PICKSTYLE system variable must be 1 or 3 to have <Group On>.
- the PICKSTYLE system variable is saved in your registry (not in drawings) with an initial default of 1 for <Group On>.
You can toggle between <Group On> or <Group Off> by pressing & holding the <Ctrl> key while you press the A key.
- you can also toggle Object Grouping from the Selection tab of the Options dialogue box.
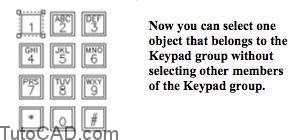
- with <Group Off> you can select a member of the group (e.g. to edit it by itself) without selecting the entire group
- groups have some of the advantages of block inserts (but it is easier to change individual objects in groups).
New Groups
You create new groups by picking the New button in the Group box.
- if Unnamed is unchecked you must type a Group Name before you pick the New button.
- you can also enter an optional Description to remind you what the group represents.
- check Selectable before you pick New if you want to be able to select all members of that group by selecting only one member.
You are prompted to select objects to include in the group when you pick the New button.
- then you are returned to the Object Grouping dialogue box and the new group name appears in the Group Name list.
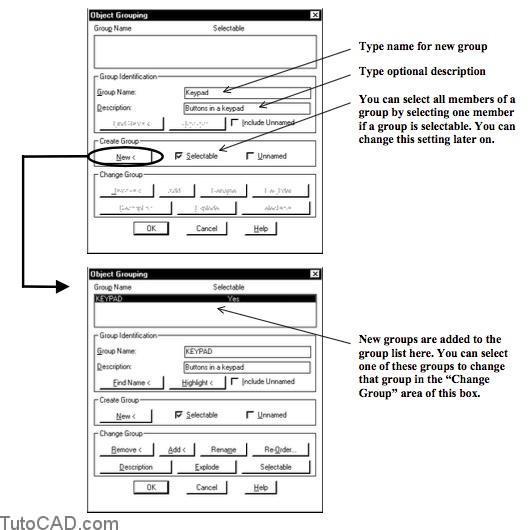
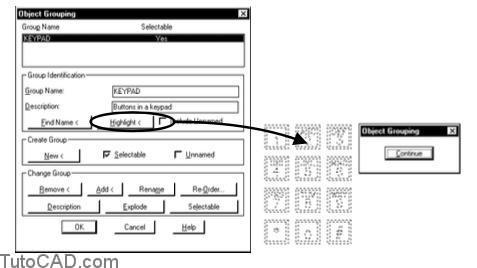
Select a group in the Group Name list and pick the Highlight button to see the objects that belong to that group.
- pick Continue to return to the Object Grouping box.
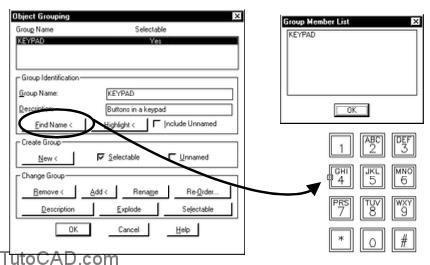
Find Name
Pick the Find Name button and you are prompted to select an object in the drawing.
- the group name is displayed in a dialogue box if the selected object belongs to a group.
- pickOKto return to theObject Groupingbox.
Include Unnamed
If the Include Unnamed box is checked you will see unnamed groups (if there are unnamed groups) in the Group Name list.
Change Group
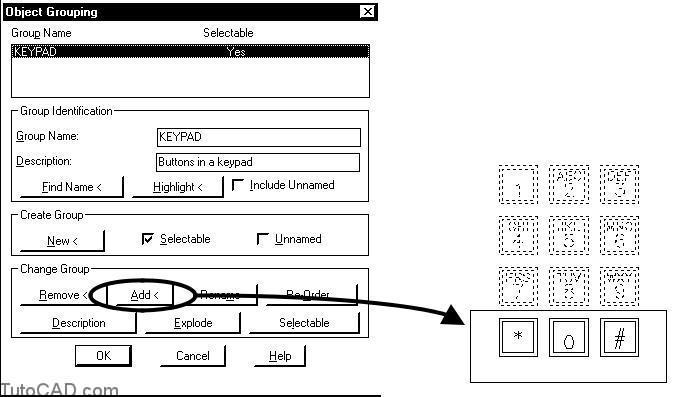
You can change an existing group by using buttons located in the Change Group area of the Object Grouping box.
- You must first select the desired group in the Group Name list.
- the Change Group buttons will then be available for the selected group.

- use the Remove button to remove objects from the group (selected objects are no longer a member of the group).
- use the Add button to add more objects to the group.
- type a new Group Name for a selected group then pick Rename to change the name of an this group.
- type a new Description for a selected group then pick Description to change the description of this group.
- pick Explode to eliminate the selected group (the members of that group remain in the drawing).
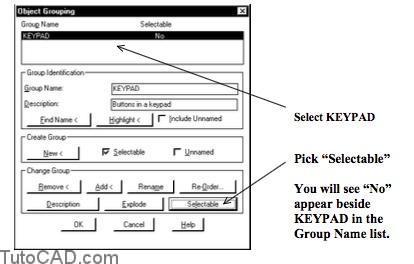
- pick the Selectable button to toggle the Selectable setting (Yes/No) for the group selected in the Group Name list.
- pick the Re-Order button to change the order of objects in the selected group.
PRACTICE CREATING & USING GROUPS
- 1) Close the drawing from the previous exercise if it is open.
- 2) Open the T201_3.dwg drawing file in your personal folder.
- 3) Type G at the command line to invoke the Group command.
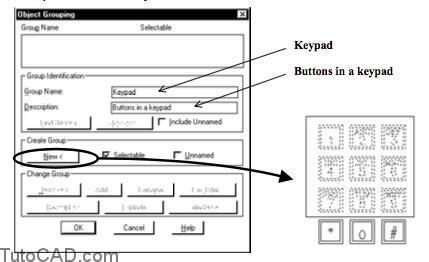
Type Keypad as the Group Name and type Buttons in a keypad as the Description. Selectable should be checked.
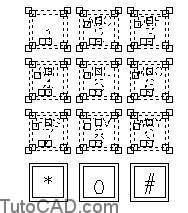
Pick the New button and use an implied Window shown below to select objects in the first 9 buttons. Press <enter> to return to the Object Grouping box and pick OK to complete the Group command.
4) Press and hold the <Ctrl> key while you press the A key a few times and observe your command line. Stop when you see <Group on> in the command line.
Command: <Ctrl>+A <Group off> <Ctrl>+A <Group on> <Ctrl>+A <Group off> <Ctrl>+A <Group on>
5) Select any part of the button number 1 when no command is running and you will select all nine buttons in the keypad group. Press <Esc> twice to clear the grips.
6) Press and hold the <Ctrl> key while you press the A key once. You should see <Group off> on the command line.
Command: <Ctrl>+A <Group off>
7) Select the outer rectangle around button number one when no other command is running. Then press <Esc> twice to clear the grips.
8) Type G at the command line to invoke Group. Select KEYPAD in the Group Name list. Pick the Add button and select the remaining 3 buttons using the implied Window shown below. Press <enter> to return to the Object Grouping box then pick OK to exit Group.
The other objects (that are already a member of the Keypad group) should be highlighted in the drawing when you pick the Add button.
- when you selected the bottom three buttons they should havebeen highlighted too.
- after you exit Group the objects should no longer be highlighted but all 12 buttons should now belong to the Keypad group.
9) Press and hold the <Ctrl> key while you press the A key once. You should see <Group on> on the command line.
Command: <Ctrl>+A <Group on>
10) Pick Modify + Move. Type G when prompted to select objects and then type KEYPAD as the group name. Press <enter> to continue. Type 1,0 as the displacement and press <enter> at the prompt for the second point of displacement. The command line history is shown.
Command: MOVE ↵
Select objects: G ↵
Enter group name: KEYPAD ↵
44 found
Select objects: ↵
Specify base point or displacement: 1,0 ↵
Specify second point of displacement or <use first point as displacement>: ↵
Command:
You can select all members of a group with <Group On> by picking a member of that group or by typing G & then the group name.
- but the group must be selectable.
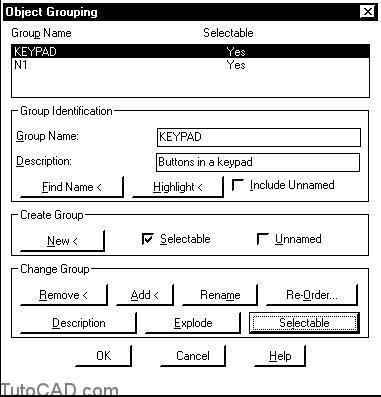
11) Type G at the command prompt to invoke Group. Select the KEYPAD in the Group Name list. Pick the Selectable button in the Change Group area and observe the word “No” under Selectable in the Group Name list. Then pick OK.
12) Pick Modify + Move. Type G when prompted to select objects and then type KEYPAD as the group name. Press <enter> to continue. Press <Esc> twice to cancel the Move when you are told that this group is not selectable.
Command: MOVE ↵
Select objects: G ↵
Enter group name: KEYPAD ↵
That group is not selectable.
Invalid group name.
Enter group name: <Esc> *Cancel*
0 found
Select objects: <Esc> *Cancel*
Command:
When a group is not selectable you cannot select all members of the group by picking one group member (even with <Group on>).
- and you cannot select the group by typing G & the group name.
- you canchange the selectable statusof an existing group at anytime using the Group command.
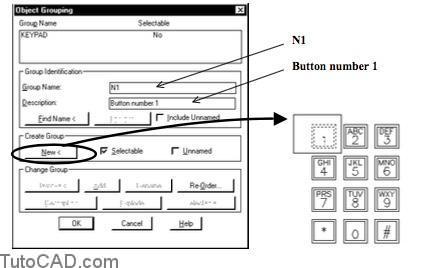
13) Type G at the command line to invoke the Group command.Type N1 as the Group Name and type Button number 1 as the Description. Selectable should be checked. Pick the New button and use an implied Window shown below to select objects of the first button. Press <enter> to return to the Object Grouping box and remain in this dialogue box for the next step.
14) Select KEYPAD in the Group Name list and pick the Selectable button to make that group selectable (Yes) again. Then pick OK to exit Group.
15) Pick Modify + Move. Press & hold <Ctrl> while you hold your pickbox above the button number 1 near P1. Then left-click to invoke selection cycling. Release <Ctrl> and repeatedly left-click to cycle between the two different groups being highlighted. Press <Esc> twice to cancel the Move command.

Objects can belong to more than one group and groups can be nested inside one another.
- you can use selection cycling to control which group is selected when you select an object that belongs to more than one group.
» 16) Save the changes to this drawing and Close the file.