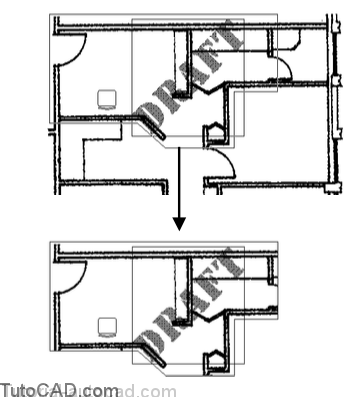
Clipping Images
You can use Imageclip to clip Images in the same way you can use other utilities to clip Xrefs & Viewports (in layouts)
- except you cannot use an existing LWPOLYLINE object to define new clipping boundaries for images.
The default option of Imageclip is New which lets you define a new Rectangular or Polygonal clipping boundary.
- use the ON or OFF options to toggle clipping on or off for a selected image.
- use the Delete option to delete an existing boundary.
Command: IMAGECLIP ↵
Select image to clip: (select frame of desired image)
Enter image clipping option [ON/OFF/Delete/New boundary] <New>: ↵
Enter clipping type [Polygonal/Rectangular] <Rectangular>: (etc.)
PRACTICE CLIPPING IMAGES
- Close any drawings from the previous exercises.
- Open the T203_6.dwg in your personal folder.
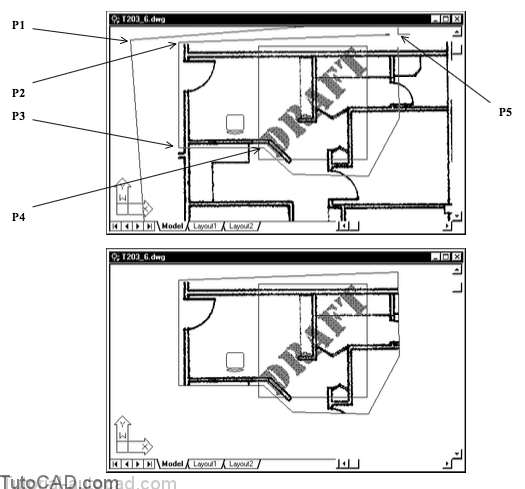
- Pick Modify + Clip + Image. Select the frame for the office plan image near P1 and press <enter> to continue. Follow the dialogue below to create a polygonal shaped clipping boundary.
Command: IMAGECLIP ↵
Select image to clip: (pick frame of office image near P1)
Enter image clipping option [ON/OFF/Delete/New boundary] <New>: ↵
Enter clipping type [Polygonal/Rectangular] <Rectangular>: P ↵
Specify first point: (pick near P2)
Specify next point or [Undo]: (pick near P3)
Specify next point or [Undo]: (pick near P4)
(keep picking points to define the polygon shown)
Specify next point or [Close/Undo]: (pick near P5)
Specify next point or [Close/Undo]: ↵
Command:
4) Right-click in the drawing area to invoke a shortcut and select Repeat IMAGECLIP. Follow the dialogue below to turn clipping off for the clipped office image.
Command: IMAGECLIP ↵
Select image to clip: (select new clipped boundary for the office image)
Enter image clipping option [ON/OFF/Delete/New boundary] <New>: OFF ↵
Command:
Imageframe must be On to select images for clipping (or perform any other edit command on them).
5) Turn clipping back on for this image.
6) Turn image frames off.
7)Save this drawing and Close the file.


