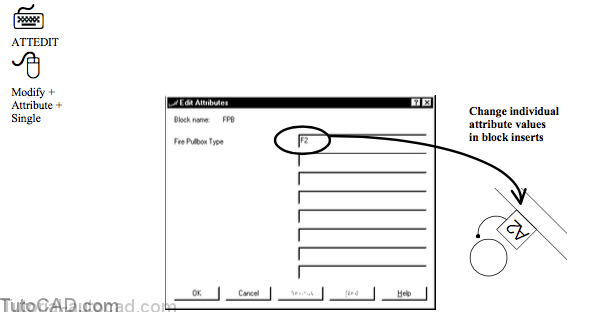
Changing Attributes In Block Inserts
You can change values for the attributes of Single block inserts when you use the Attedit command in the dialogue box mode.
- you use the same dialogue box to edit existing values that you use when you Insert a new block insert.
When you use Attedit in the command line mode you can change more than just the attribute values for existing block inserts.
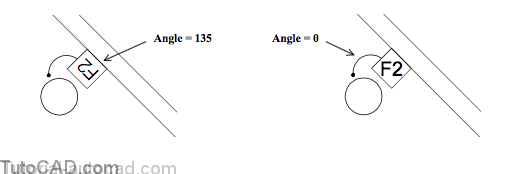
- you can change the Value, Position, Height, Angle, Style, Layer and Color of attributes in existing block inserts.
- for example, you could change an attribute Angle from 135 to 0 (to make it easier to read this value in drawings).
You can invoke Attedit in command line mode by typing a hyphen before you type Attedit (i.e. – ATTEDIT )
- you will automatically invoke Attedit in Command line mode by picking Modify + Attribute + Globlal from the pulldown menu.
PRACTICE CHANGING ATTRIBUTES IN BLOCK INSERTS
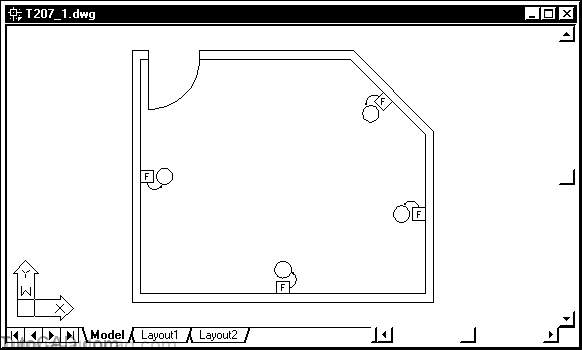
» 1) Continue with the same drawing from the previous exercise (or Open the T207_3.dwg in your personal folder).
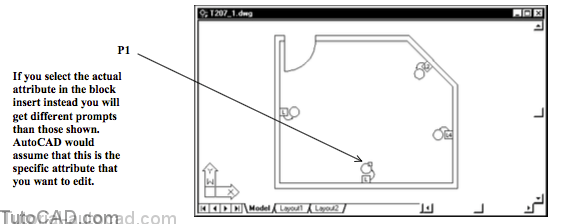
» 2) Pick Modify + Attribute + Single. Select the insert near P1 and type F as the new attribute value. Pick OK.

3) Pick Modify + Attribute + Global. Follow the dialogue below to change the Angle for one of the attributes.
Command: –ATTEDIT ↵
Edit attributes one at a time? [Yes/No] <Y>: ↵
Enter block name specification <*>: ↵
Enter attribute tag specification <*>: ↵
Enter attribute value specification <*>: ↵
Select Attributes: (pick the “F” attribute value near P1)
Select Attributes: ↵
1 attributes selected.
Enter an option [Value/Position/Height/Angle/Style/Layer/Color/Next] <N>: A ↵
Specify new rotation angle <270>: 0↵
Enter an option [Value/Position/Height/Angle/Style/Layer/Color/Next] <N>: ↵
Command:

If you select more than one attribute value to edit you can use the Next option to step through the attributes that you select.
- if you choose not to edit attributes one at a time you can globally edit the values (only) for all selected attributes.
4) Use a similar technique to change the Angle for the other two attributes so that all attributes are at a zero angle.
5) Pick Modify + Attribute + Global. Follow the dialogue below to change the letter F in all attributes to the letter L.
Command: –ATTEDIT ↵
Edit attributes one at a time? [Yes/No] <Y>: N ↵
Performing global editing of attribute values.
Edit only attributes visible on screen? [Yes/No] <Y>: ↵
Enter block name specification <*>: ↵
Enter attribute tag specification <*>: ↵
Enter attribute value specification <*>: ↵
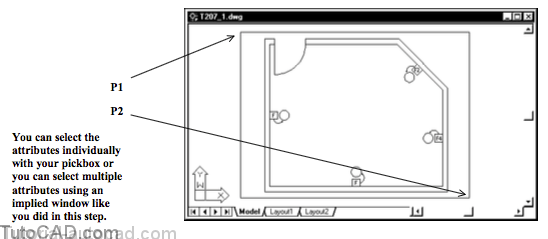
Select Attributes: (left-click in empty space near P1)
Specify opposite corner: (left-click in empty space near P2 to use an implied Window)
4 found
Select Attributes: ↵
4 attributes selected.
Enter string to change: F↵
Enter new string: L↵
Command:
The Express Tools include utilities to work with block inserts that have attributes defined in them.
- the Global Attribute Edit utility is an alternative to using Attedit in the command line mode (it is more intuitive).
- the Explode Attributes to Text utility retains attribute Values (instead of the Tag) as TEXT when you Explode a block insert.
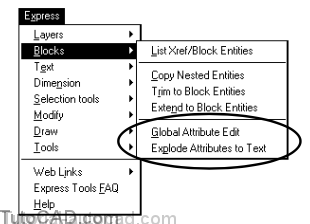
6) Pick Express + Blocks + Global Attribute Edit. Follow the dialogue below to change all attribute values to be F.
Command: GATTE ↵
AutoCAD Express Tools Copyright © 1999 Autodesk, Inc. Initializing…
Select block or attribute [Block name]: (pick the block insert near P1)
Known tag names for block: FTAG
Select attribute or type attribute name: FTAG ↵
(continue on the next page)
When a block has more than one attribute you can selectively change specific attributes using tag names.
- you should use meaningful tag names
Block: FPB Attribute tag: FTAG
Enter new text: F↵
Number of inserts in drawing = 4 Process all of them? [Yes/No] <Yes>: Y ↵
Please wait…
4 attributes changed.
Command:
You can change all (similar) attributes in the drawing if desired.
- if you reply N to the Process all of them prompt you can select the desired blocks to change.
7) Close this drawing without saving the changes as this drawing is no longer required in other sections.