How to use Basic Selection Tools
Here is how to use selection tools in AutoCAD
Edit commands will eventually prompt you to Select objects.
- your crosshairs turn into a pickbox when you see the Select objects prompt on the command line.
- you can hold your pickbox over the desired object and press your left mouse button (left-click) to select an object.
You can change your pickbox size to suit your preferences by invoking the Options command & picking the Selection tab
- If you have crowded drawings it is best to use a smaller pickbox (but if it is too small it may be difficult to select objects).
- pickbox size is stored in the PICKBOX system variable as a number of pixels so the size is related to screen resolution.
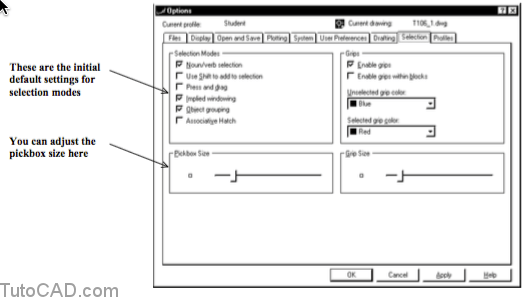
You can change how AutoCAD lets you select objects from the default modes shown above.
- these options are beyond the scope of this document but you can learn about them on your own.
- your AutoCAD system will behave in the same way described in this document if you use these default selection modes.
Using the pickbox to select objects (one at a time) is inefficient if you must select more than a few objects.
- AutoCAD has selection tools to quickly select multiple objects and you will learn how to use the basic tools in this section.
Window (to the right)
The Window tool selects an object when the entire object is inside the specified window.
You will invoke an implied Window at the Select objects prompt if you left-click when your pickbox is not above any object.
- this point will be the first corner for the implied Window.
- then you must pick (left-click) on the other corner such that this corner is on the right side of the first corner.
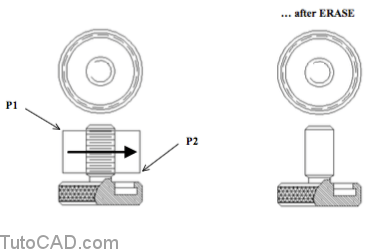
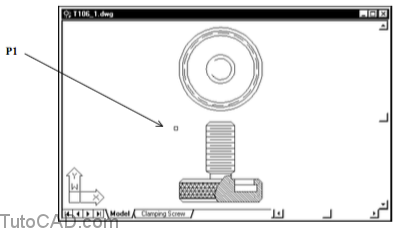
- the illustration below shows an example where an implied Window is used to select objects for Erase.
Command: ERASE↵
Select objects: (left-click near P1 when the pickbox is not above any objects)
Specify opposite corner: (left-click to the right of P1 near P2)
15 found
Select objects: ↵
Command:
You can also type W and press <enter> when you see the Select objects prompt to explicitly invoke the Window selection tool.
- you may have do this if the drawing is crowded & you are unable to left-click in an empty space at the Select objects prompt.
Crossing (to the left)
The Crossing tool is similar to Window except an object is selected if part or all of the object is inside the specified box.
- to invoke an implied Crossing tool at the Select objects prompt you can left-click when your pickbox is not above an object
- this point will be the first corner for the implied Crossing box.
- then you must pick (left-click) on the other corner of the desired box such the other corner is on the left side of the first corner.
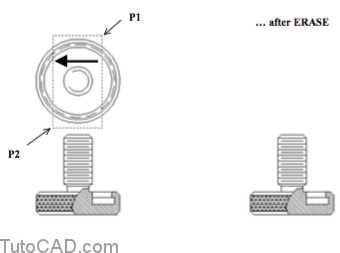
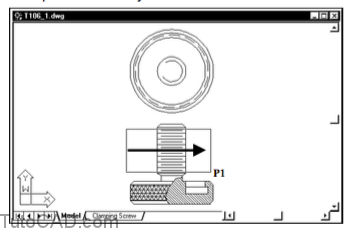
- the illustration below shows an example where an implied Crossing box is used to select objects for Erase.
Command: ERASE↵
Select objects: (left-click near P1 when the pickbox is not above any objects)
Specify opposite corner: (left-click near P2 to the left of P1)
6 found
Select objects: ↵
Command:
You can also type C and press <enter> when you see the Select objects prompt to explicitly invoke the Crossing selection tool.
- you may have do this if the drawing is crowded & you are unable to left-click in an empty space at the Select objects prompt.
You are reminded which tool you are using (Crossing vs Window) by the selection window displayed as you pick the other corner.
- the window is displayed with highlighted edges (see illustration above) when you are picking right to left for a Crossing tool
- the window is displayed with continuous edges (see previous page) when you are picking left to right for a Window tool.
If you select too many objects you can press and hold the <shift> key at the Select objects prompt
- then select the objects (de-select) that you do not want to include with the other selected objects.
You should consider learning more about other selection tools on your own later on.
- use Last to select the youngest object in the drawing (the single object you created last).
- use Previous to use the same set of objects you selected the last time AutoCAD prompted you to Select objects.
- use Fence and draw straight line segments to cross the objects that you want to select.
- use ALL to select all objects in the current space that are not on frozen layers.
- use CPolygon or WPolygon to use Crossing & Window tools with any polygon shape (not a box).
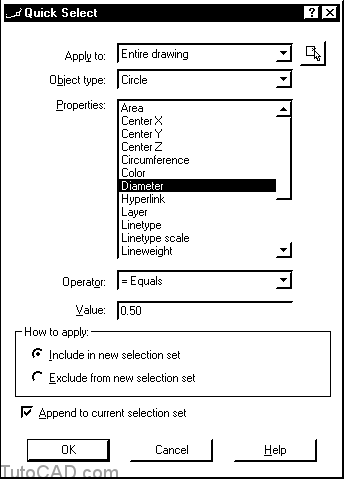
You can even use the Qselect command to specify complex criteria that AutoCAD can use to select objects automatically.
- for example, you could ask AutoCAD to look in the entire drawing for CIRCLEs with a diameter of 0.50.

PRACTICE USING BASIC SELECTION TOOLS
1) Launch AutoCAD (if it is not already running). Close all open drawings (if there are drawings open).
2) Open the T106_1.dwg drawing in your personal folder.
3) Pick Tools + Run Script. Select your personal folder to Look in and select T106.scr as the script File name. Then pick the Open button to run this script. This sets drafting tools to match the behavior described in the exercises.
4) Pick Edit + Clear. Then hold your pickbox near P1 below and left-click to use this as the first corner point.
5) Move your cursor to the left near P2 but do NOT left-click on this point. Observe the highlighted appearance of this selection box.
You pressed your left mouse button when there was no object under the pick box and the command line prompt asked you to “Select objects:”.
Now your cursor is to the left of the first point so you have invoked an implied Crossing.
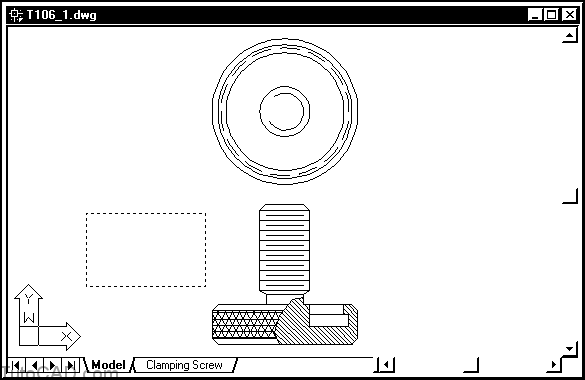
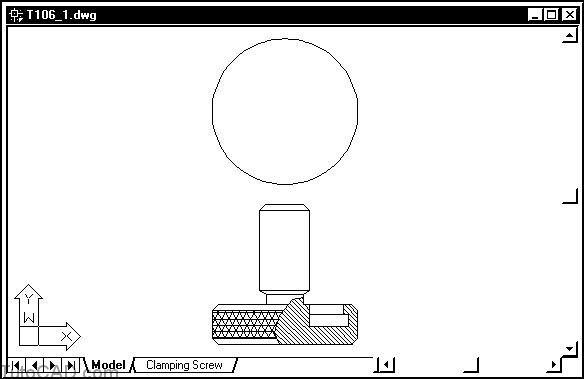
6) Now move your cursor to the right near P1 as shown below to invoke an implied Window and left-click to use this point. AutoCAD will still be prompting to Select objects: but do NOT press <enter> yet.
When the other corner is to the right of the first corner you use an implied window.
You know it is a Window because the selection box edges are not highlighted as they would be for Crossing .
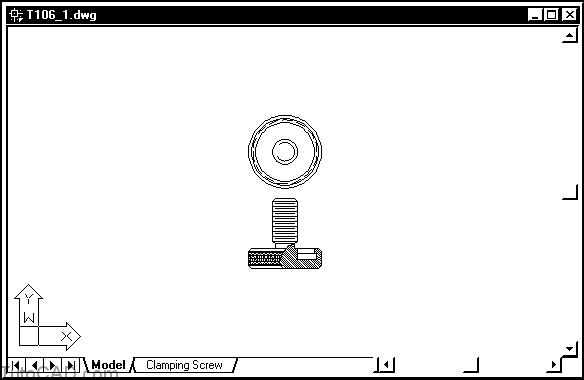
7) This time hold your pickbox near P2 below and left-click when no object is under the pickbox.

After you use a selection tool AutoCAD comes back to the Select objects prompt so you can use another tool to select more objects.
- so far you have selected several horizontal LINE objects and they are now highlighted.
- you just left-clicked in an empty area of the drawing again so you can pick another corner for an implied Crossing or Window.
8) Move your cursor near P1 below and left-click to use an implied Crossing tool. Do NOT press <enter> yet.
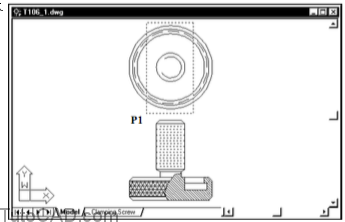
9) Press and hold the <shift> key while you hold your pickbox over the largest CIRCLE near P2 and then left-click to de-select this CIRCLE. Do NOT press <enter> yet.
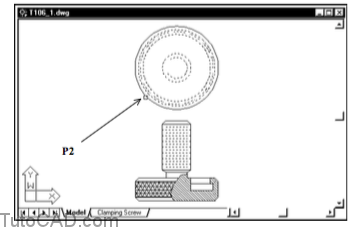
You left-clicked near P2 but did NOT invoke an implied Crossing or Window this time because there was an object under the pickbox.
10) Press F2 to examine the command line history. Then press F2 to return to the drawing window again.
Command: _erase
Select objects : Specify opposite corner :
15 found
Select objects: Specify opposite corner:
6 found, 21 total
Select objects: 1 found, 1 removed, 20 total
AutoCAD keeps returning to the Select objects prompt after you use a selection tool.
- the only way to complete the task is to press <enter> or right-click in the drawing area at this prompt.
11) Right-click in the drawing area to signal AutoCAD that you have finished selecting objects for Erase.
All objects that were highlighted (selected) before you right-clicked are now erased.
12) Pick View + Zoom + Out.
13) Type OOPS at the keyboard and press <enter> to invoke this command to recall the set of objects selected in the last Erase command.
OOPS is not the same as UNDO.
When you UNDO you reverse the last command.
In this case, the last command was ZOOM and you were able to bring back the erased objects using OOPS without reversing the last ZOOM command.
14) Save these changes to T106_1.dwg then Close this file.