How to use Single Line TEXT Objects
Free course how to use Single Line TEXT to create text Objects in AutoCAD
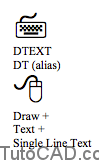
Use Dtext to create individual lines of TEXT objects.
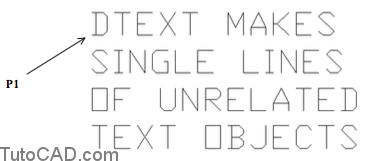
- you can create multiple lines using this approach but each line of text is a separate TEXT object (unrelated to the other lines).
- for example, the four individual TEXT objects shown below could be created using the command line history shown.
Command: DTEXT↵
Current text style: “Standard” Text height: 0.2000
Specify start point of text or [Justify/Style]: (pick P1)
Specify height <0.2000>: 1 ↵
Specify rotation angle of text <0>: ↵
Enter text: DTEXTMAKES↵
Enter text: SINGLE LINES ↵
Enter text: OF UNRELATED ↵
Enter text: TEXTOBJECTS↵
Enter text: ↵
Command:
- You can continue to type new lines of TEXT and the next line is automatically spaced below the previous line of text
- press <enter> instead of typing another line of TEXT to terminate the Dtext command.
- each line of TEXT is unrelated to the others, so you could (for example) Erase one line of TEXT without disturbing the others.
- You see each character displayed dynamically (D in Dtext stands for dynamic) in the drawing as you type it on the keyboard.
- the current text style and height are reported at the first prompt and these are used unless you explicitly change them.
Justification determines how the TEXT object is oriented relative to the start point (Insert osnap) of the TEXT object.
- by default your TEXT is left justified which means the TEXT object grows above and to the right of the start point.
- to select a different justification option you can enter J at the first prompt or right-click and select Justify from a shortcut.
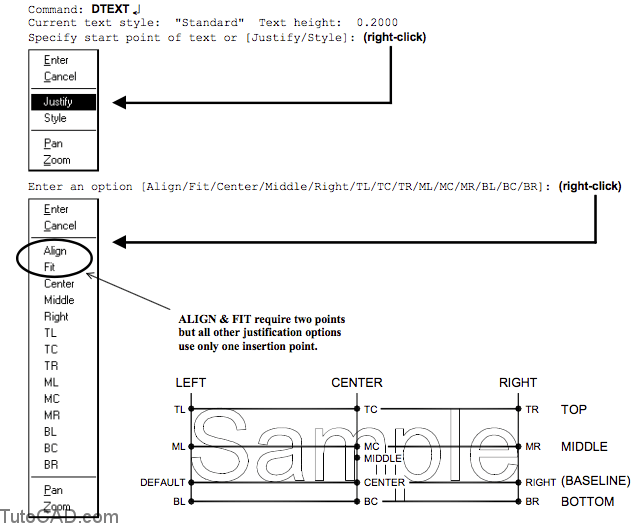
The two letter abbreviations represent the intersection point of horizontal Top/Middle/Bottom & vertical Left/Center/Right lines.
- for example, TL is the intersection of the Top horizontal line with the Left vertical line (which is the upper left corner point).
- three single point justification options (Middle, Center & Right) do not have a two letter abbreviation.
- Align justification uses two points.
- the text size is scaled up or down (equally in all directions) such that the text you type fits between these two points.
- it is difficult to maintain consistent text height using this option.

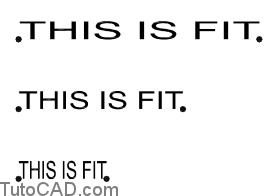
Fit justification also uses two points.
- text is compressed or stretched to fit between these points but the text height remains constant.
- in extreme cases text is difficult to read.
Most drawings can use the default (left) justification.
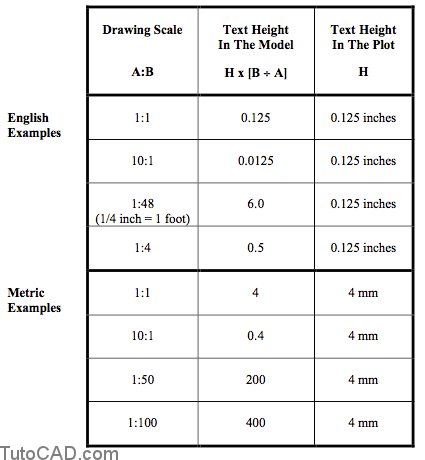
TEXT height is expressed in drawing units and you must take the drawing scale into account when TEXT is in your Model.

The following table illustrates how to calculate appropriate text heights in drawing units when you create TEXT in the Model.
- -establish the desired text height in plots [H] (drafting standards or personal preferences).
- -express the drawing scale as A:B.
- -calculate the required text height in the Model by multiplying the desired height in plots by the factor [B A].
When you change drawing scales after creating TEXT in your Model you must Scale this TEXT to compensate for this change.
- you should delay adding TEXT in the Model until AFTER you are reasonably sure what the drawing scale will be.
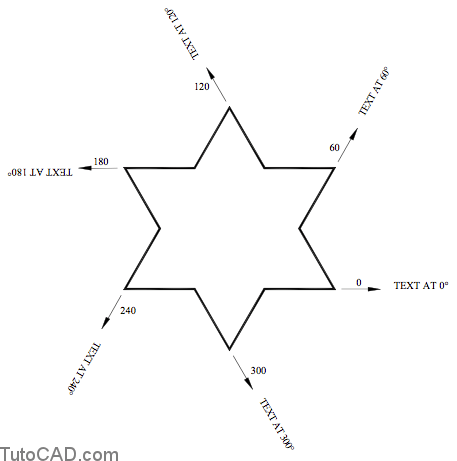
The rotation for TEXT is normally zero degrees which orients TEXT objects parallel to the X axis.
- you can rotate TEXT objects using the Rotate command at any time after you create TEXT objects.
- if you know that TEXT must be rotated you can specify this rotation angle when you create TEXT using Dtext.
- counter-clockwise is the normal direction for positive rotation.
Command: DTEXT↵
Current text style: “Standard” Text height: 0.2000
Specify start point of text or [Justify/Style]: (pick point)
Specify height <0.2000>: (type new height or accept default) ↵
Specify rotation angle of text <0>: (type new angle or accept default) ↵
Enter text: (type desired text string)
If you use a different rotation angle this becomes the default Dtext rotation for the current drawing until you Open it in another session.
– the rotation <default> for Dtext is 0 in new drawing sessions.
Practice: using DTEXT tutorial in AutoCAD
- Launch AutoCAD (if it is not already running). Close all open drawings (if there are drawings open).
- Open the T110_1.dwg drawing in your personal folder.
- Pick Tools + Run Script. Select your personal folder to Look in and select T110.scr as the script File name. Then pick the Open button to run this script. This sets drafting tools to match the behavior described in the exercises.
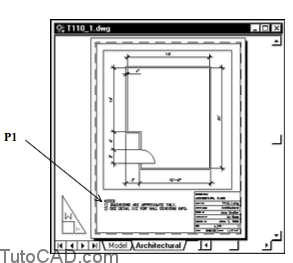
This drawing is in inches and the drawing scale is 1:48. When you open this drawing you should be in the Architectural layout.

- Pick Draw + Text + Single Line Text and examine the command line without doing anything (yet).
Command: _dtext
Current text style: “ARCH” Text height: 6.0000
Specify start point of text or [Justify/Style]:
The last text height used in this drawing file was 6 drawing units.
this would generate TEXT that is 1/8th of an inch (0.125) if it was created in the Model and you plot at a 1:48 scale.
however, you are presently in a Layout and if you create TEXT now at this size it would be 6 inches high in the plot.
the default size of TEXT is retained in the TEXTSIZE system variable and this is stored in the drawing.
- Pick by eye near P1 as the start point of the TEXT. Then enter 0.125 as the text height and press <enter> to accept the default rotation of zero. Type the three lines of TEXT shown in the command history below then press <enter> to terminate Dtext.
Command: _dtext
Current text style: “ARCH” Text height: 6.0000
Specify start point of text or [Justify/Style]:
Specify height <6.0000>: 0.125 ↵
Specify rotation angle of text <0>: ↵
Enter text: NOTES ↵
Enter text: 1) DIMENSIONS ARE APPROXIMATE ONLY. ↵
Enter text: 2) SEE DETAIL XYZ FOR WALL COVERING INFO. ↵
Enter text: ↵
Command:
- You created three new TEXT objects in this drawing and they are not related or associated with each other. - each time you pressed the <enter> key the next line of TEXT was created below the previous line by an appropriate space.
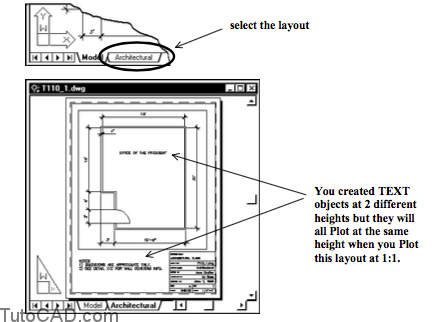
- The TEXT height is 0.125 drawing units & when you Plot this Layout at a 1:1 scale the TEXT height will be 0.125 inches in the plot.
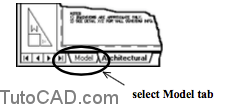
- Left-click on the Model tab at the bottom of the screen to switch to the Model.
- Pick Draw + Text + Single Line Text and examine the command line without doing anything (yet).
Command: _dtext
Current text style: “ARCH” Text height: 0.1250
Specify start point of text or [Justify/Style]:
- The default Text height is now 0.125 because you used this height in the last Dtext command.
- if you create TEXT at this size in the Model it will be almost invisible (0.0026 inches) in the plot at a 1:48 drawing scale.
- for example, the wall LINEs are 4 inches apart which is enough space for 32 TEXT objects to fit between wall LINEs.
- If TEXT created in the Model must Plot at 0.125 inches when the drawing scale is 1:48 then TEXT height in the Model should be 6.0
- [H] x [B A] = 0.125 x [48 1] = 6.0 (see page 7).
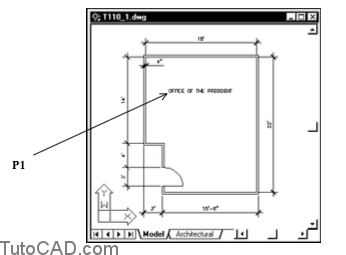
- Pick by eye near P1 as the start point of the TEXT. Then enter 6.0 as the text height and press <enter> to accept the default rotation of zero. Type OFFICE OF THE PRESIDENT and press <enter> to terminate Dtext. The complete command line history is shown.
Command: _dtext
Current text style: “ARCH” Text height: 0.1250
Specify start point of text or [Justify/Style]: (pick near P1)
Specify height <0.1250>: 6 ↵
Specify rotation angle of text <0>: ↵
Enter text: OFFICE OF THE PRESIDENT ↵
Enter text: ↵
Command:
- Left-click on the Architectural tab to switch to this layout.
- Save the changes to this drawing and Close the file.
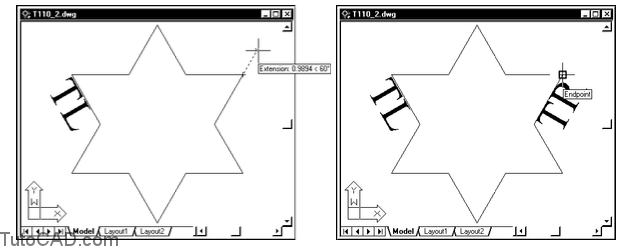
- Open the T110_2.dwg in your personal folder.
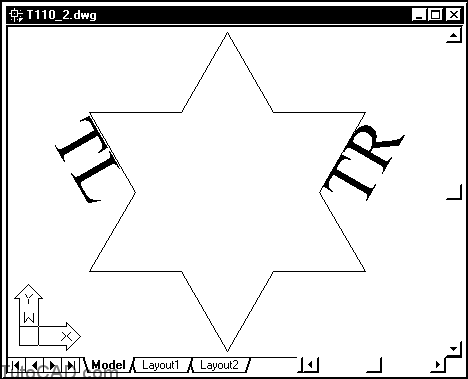
In the remainder of this exercise you will use Dtext to create two new TEXT objects shown above.
– one object will use the Top Right justification with a 60 degree rotation angle.
– the other object will use Top Left justification with a 300 degree rotation angle.
- Pick Draw + Text + Single Line Text.
- Left-click on the OSNAP status bar button to turn this setting On (if it is not already On).
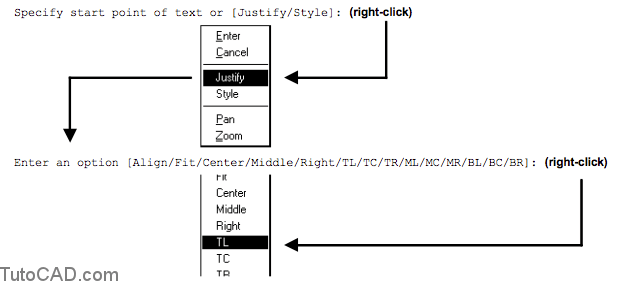
- Right-click in the drawing area to invoke a shortcut and select Justify. Then right-click again and select TL from another shortcut.
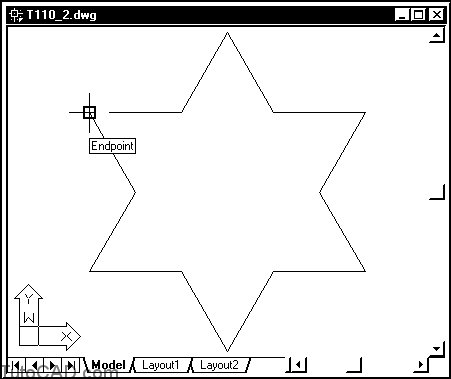
- Hold your crosshairs to invoke the Endpoint osnap shown below and left-click to use this as the top left point for the new TEXT object.
- Type 1.0 and press <enter> for the new text height.
Specify height <0.2000>: 1 ↵
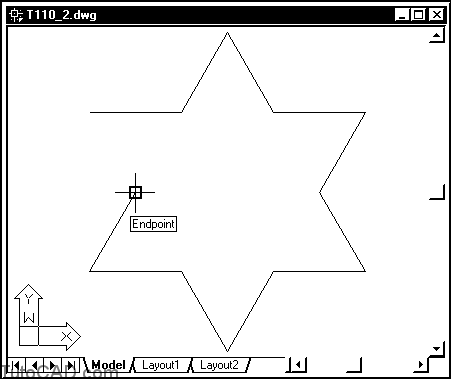
- Move your crosshairs to invoke the Endpoint osnap shown below and left-click which will use this point to specify the rotation angle (the direction is from the start point).
- Enter the text TL and then press <enter> to terminate Dtext.

- The text is displayed using the default justification while the current Dtext command is running.
- – when you terminate Dtext the justification that you specified is applied to the new TEXT objects.
- You specified the rotation angle by using two Endpoint osnaps.
- -if you can snap to convenient points for the desired direction this can be a faster alternative compared to typing at the keyboard.
- -the first point is anchored at the start point for the TEXT so this limits your options for picking the second point.
- -you can use POLAR tracking and object snaps (e.g. Extension) for the second point when specifying a rotation angle.
- Still more practice?
- Create the other TEXT object shown below using the Top Right justification with a 60 degree rotation angle and a height of 1.(Tip: use the Extension osnap shown to pick the rotation angle instead of typing it) Use the Endpoint osnap shown below as the top right point for this text. Type TR when prompted to enter text.
- Save the changes to this drawing then Close the file.